配置Ceph环境
请在OpenStack上集成Ceph块存储作为Glance和Cinder服务的后端存储。在OpenStack上集成Ceph块存储之前,需要首先配置Ceph环境。
- 在Ceph存储节点创建所需的存储池。
ceph osd pool create volumes 32
ceph osd pool create images 32
ceph osd pool create backups 32
ceph osd pool create vms 32

存储池volumes、images、backups和vms后面的数值为PG(Placement Group)数目,请根据实际需要设置。
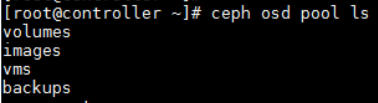
- 查看创建的存储池。
ceph osd pool ls
可以看到存储池已经创建成功。
- 在Ceph存储节点上为cinder、glance、cinder-backup用户创建keyring,允许其访问Ceph存储池。
ceph auth get-or-create client.cinder mon 'allow r' osd 'allow class-read object_prefix rbd_children, allow rwx pool=volumes, allow rwx pool=vms, allow rx pool=images'
ceph auth get-or-create client.glance mon 'allow r' osd 'allow class-read object_prefix rbd_children, allow rwx pool=images'
ceph auth get-or-create client.cinder-backup mon 'profile rbd' osd 'profile rbd pool=backups'
ceph auth get-or-create client.glance | ssh controller tee /etc/ceph/ceph.client.glance.keyring
ssh controller chown glance:glance /etc/ceph/ceph.client.glance.keyring
ceph auth get-or-create client.cinder | ssh compute01 tee /etc/ceph/ceph.client.cinder.keyring
ceph auth get-or-create client.cinder | ssh compute02 tee /etc/ceph/ceph.client.cinder.keyring
ssh compute01 chown cinder:cinder /etc/ceph/ceph.client.cinder.keyring
ssh compute02 chown cinder:cinder /etc/ceph/ceph.client.cinder.keyring
ceph auth get-or-create client.cinder-backup | ssh compute01 tee /etc/ceph/ceph.client.cinder-backup.keyring
ceph auth get-or-create client.cinder-backup | ssh compute02 tee /etc/ceph/ceph.client.cinder-backup.keyring
ssh compute01 chown cinder:cinder /etc/ceph/ceph.client.cinder-backup.keyring
ssh compute02 chown cinder:cinder /etc/ceph/ceph.client.cinder-backup.keyring
ceph auth get-key client.cinder | ssh compute01 tee client.cinder.key
ceph auth get-key client.cinder | ssh compute02 tee client.cinder.key
命令中controller、compute01、compute02为对应cinder、glance、cinder-backup服务所在节点的主机名,请根据实际环境配置。
- 在OpenStack计算节点上,向libvirt添加密钥。
- 生成UUID。
uuidgen
保存上述命令生成的UUID,且仅在其中一个节点生成即可,其他节点也使用这个UUID。
- 在所有OpenStack计算节点生成配置文件。
cat > secret.xml <<EOF
<secret ephemeral='no' private='no'>
<uuid>UUID</uuid>
<usage type='ceph'>
<name>client.cinder secret</name>
</usage>
</secret>
EOF
- 在所有OpenStack计算节点向libvirt添加密钥。
virsh secret-define --file secret.xml
virsh secret-set-value --secret UUID --base64 $(cat /etc/ceph/ceph.client.cinder.keyring | grep key | awk -F ' ' '{ print $3 }')
预期结果示例如下,添加密钥时提示的错误信息不影响正常功能使用,请忽略。

- 生成UUID。
父主题: 在OpenStack上集成Ceph块存储
